SYAZUAN SAB'ARI
Portfolio
3D MODELS
These are the 3D Models I created during the course of my studies for my diploma.
I have exposed myself to different Modeling and Animation software; Autodesk 3DS Max, Cinema4D, Creo Parametric.
Monster hunter memorabilia:
Charge blade


Year 3, 2018
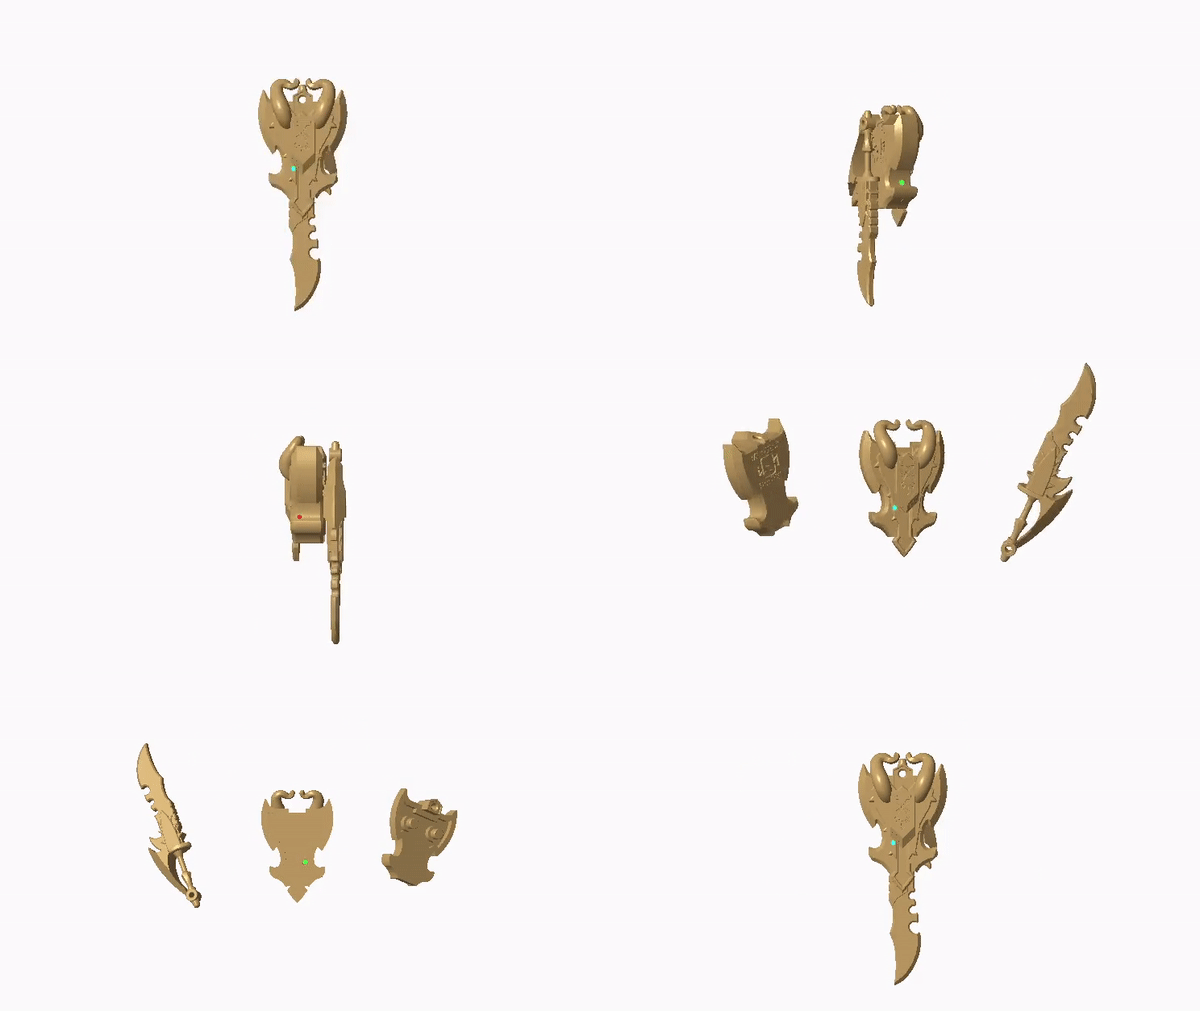
For my Rapid Prototyping and Model Making module (RPTMOD), I was assigned to model a product that I could keep after it is 3D-Printed.
Since it is rare and hard to find “Monster Hunter” related merchandise, I am keen on using this opportunity to make such merchandise on my own, a pendant. The product has 3 parts, the Shield Front, Shield Back, and the Sword. There is engraving of the “Monster Hunter” title at the back of the Shield. The pendant can be worn and be used as a keychain. It can also be displayed
as a figure.
I used a reference image I found online of the Charge Blade and imported it to Creo Parametric for easy modeling.
The horns and handle were made by using the “Sweep Blend” feature to draw a trajectory. Other methods include "Chamfer", "Shell", "Extrude", "Project", "Mirror", and "Round".
Modeled in Creo Parametric
3D-Printed on Eden PolyJet

Audi r8 spyder ENGINE


Year 2, 2017
For my Interactive Digital Media Project Module (IDMPROJ), we are tasked to model and animate a Trailer.
My group and I agreed on making an Audi R8 Spyder Launch Trailer. I modeled the Audi R8 Spyder V-Twin Engine. It was a daunting and challenging task, but fruitful in the end.
I followed the reference image found online closely, and modeled the engine accordingly.
A challenge for me in modeling this engine was to avoid making it look simple. With the skills I learned from this course in modeling, I was able to produce a significantly complex and uber engine. With the guidance and feedback from my course lecturer and peers, I was able to improve my model even further.
After much experimenting, I utilized the splines, the "Sub-division Surface" function for the top of the engine, the "Sweep" function for the pipes, and the "Array" function for the details of the drum in modeling the engine.
Modelled in C4D

.png)
3D REALTIME VISUALISATION
scene modeling
modelled SCENE

REFERENCE IMAGE


Year 3, 2018
I modelled an interior scene in Cinema4D, with a reference image obtained online. The objective is to achieve photo-realistic models and having a low poly count as low as possible to be compatible in real-time.
Here is the list of 20 items modelled by myself:
1. Circular Window
2. Coffee Table
3. Study Chair
4. Study Table
5. Potted Plant
6. Air Vent Fan
7. Pipes
8. Multi-monitor
9. Sofa
10. Books (Stacked)
11. Ladder
12. Fluorescent light
13. Bottle
14. Military Weapon Case
15. Bed
16. Pillows
17. Mugs
18. Arm Chair
19. Bedframe top
20. Keyboard
Modeled in Cinema4D
Rendered in Unity 3D

CAD PROTOTYPING & MODELING


Year 2, 2017
In Product, Process, and Computer-Aided Design (PPCAD), I learned how to improve the ergonomics of an existing product and design using Computer-Aided Design (CAD). I learned that modeling and improving products on CAD software are not as challenging as it seems at first. It takes an amount of accuracy and attention to detail. It also takes certain processes taken into consideration, as for example, the research and sketching of the product before modeling it.
I modeled the Nintendo SNES controller. The improvements I made to the product are thinner cable wire and ergonomic buttons that are easy to reach for the user.
When modeling the product, I used mainly the Extrude, Sweep, Shell, Round, and Chamfer features.
What I have learned from this project and module will be viable and useful for me in the future, partaking in 3D modeling as a career.
Modeled in Creo Parametric
Caustics modeling

Year 2, 2017
I made a reflective model in my Advanced Digital Animation and Special Effects module (AVDASE). In this assignment, I learned about the caustic, reflection, and refraction values of a model during rendering and modeling.
I also learned that lighting plays a key role in contributing to caustic values.
I modeled this by applying the Array function to a 5-sided polygonal shape and gave depth to it. I then produced and placed a reflective material with a gradient base color. For the lighting, I added value to the noise of the light rays.
Modeled in Cinema4D
BP-UV PAINT SIGNBOARD

Year 2, 2017
In this assignment, I made a signboard and using BP-UV Paint in Cinema4D during my AVDASE module. In BP-UV Paint, I am able to paint Bump textures on the 3D model, utilizing different brush tips for different Bump effects.
I also did a UV Map of the signboard by adding pictures and text in it, which are edited in Photoshop.
Modeled in Cinema4D
BP-UV PAINT BUST

Year 2, 2017
This is a bust of a female human model, UV Painted.
This assignment focuses on the creativity and the implementation of the various Brush tip Presets available in the BP-UV Paint layout in Cinema4D in coloring the bust.
I break the norms of having to just paint a normal human bust, and instead, paint a zombie character. I painted the neck and the forehead to resemble stitches and added splashes of blood. I drew the eyebrows, green highlights of the hair, and the eye shadow of the character.
Modeled in Cinema4D